Vinyl seawalls offer a solid solution for shoreline protection, especially for those wanting something durable and low maintenance. Installing your own vinyl seawall can be a seriously rewarding weekend project if you’re comfortable with basic DIY work and don’t mind putting in a bit of elbow grease. This guide breaks down what you need, how the process works, and my tips for making sure your new seawall stands the test of time.
Why Go With a Vinyl Seawall?
Vinyl seawalls are getting more common for a bunch of good reasons. These panels resist corrosion and UV damage, making them perfect for wet or salty environments where wood or steel can fail. I’ve found that vinyl is lightweight compared to concrete or steel, so it’s easier to work with if you’re doing the labor yourself. Plus, ongoing maintenance is easy. Give it a check for cracks and occasional cleaning to keep it in top shape.
Another bonus: vinyl panels often come in several colors, fitting right into your landscaping plan without much fuss. Many lakefront homeowners use vinyl seawalls to stop erosion and keep their shorelines looking neat and tidy.
How Vinyl Seawalls Are Built
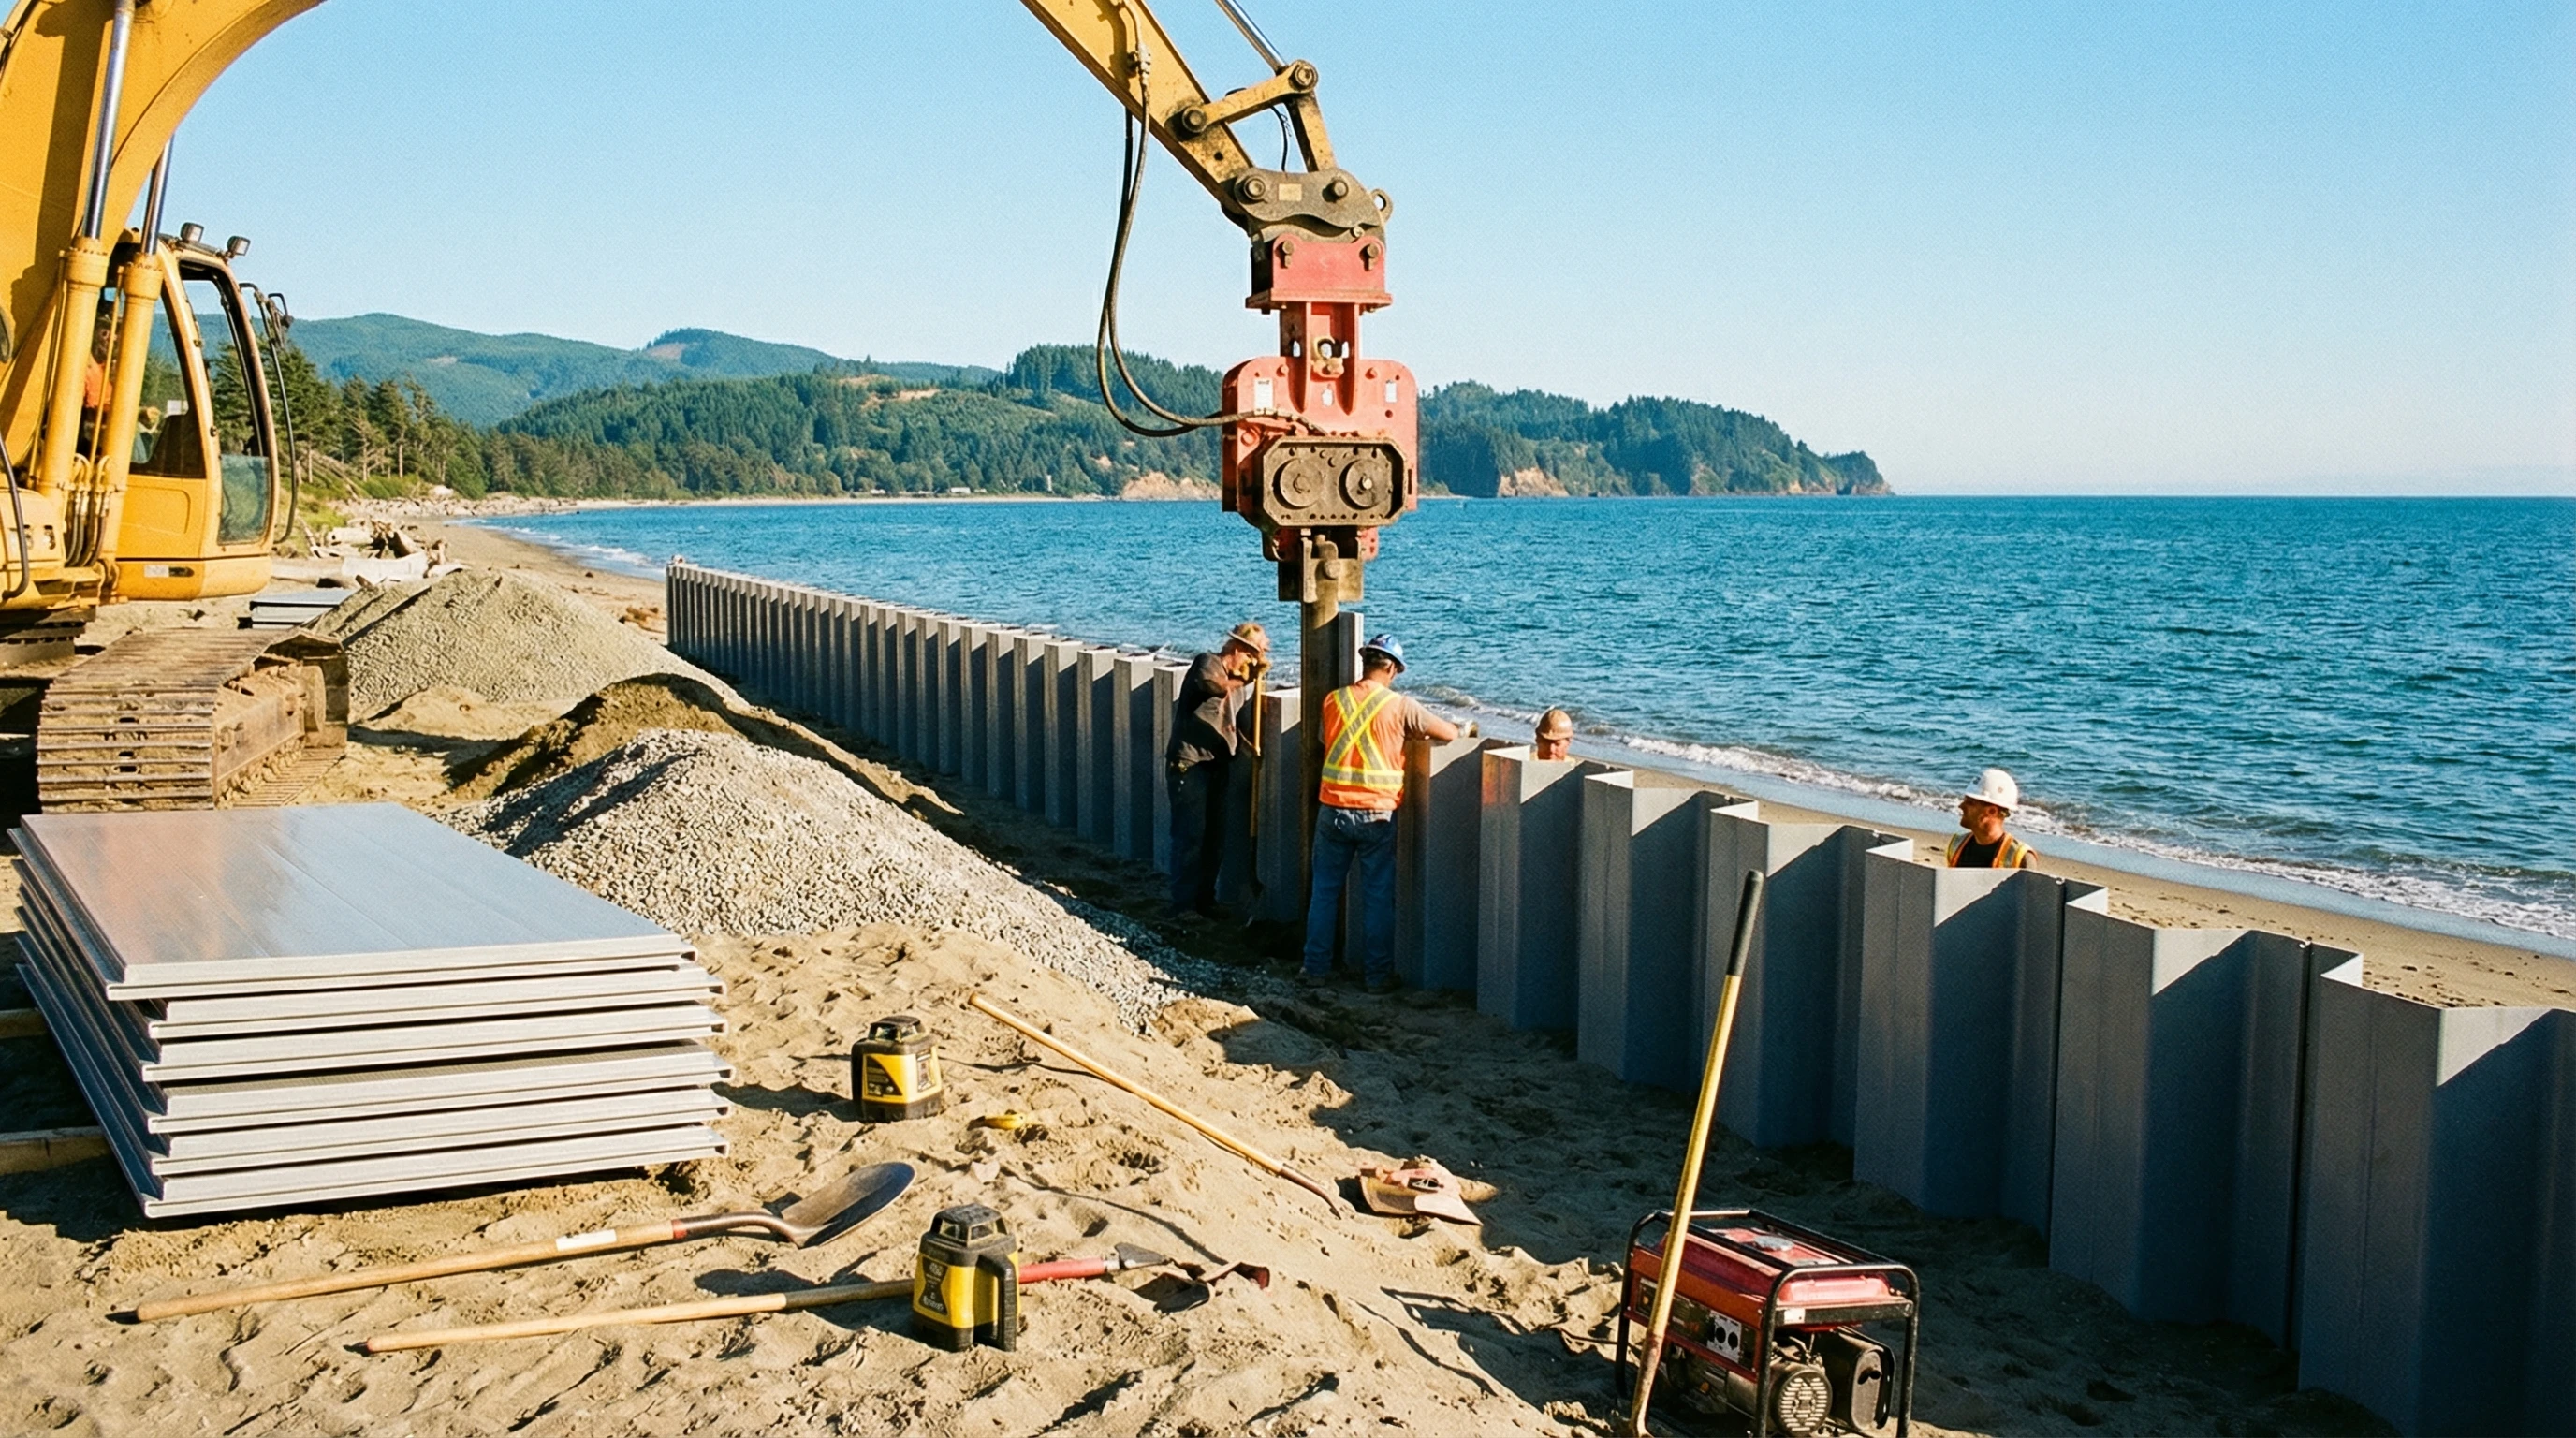
The main idea behind a vinyl seawall is stacking tough interlocking panels vertically along the shoreline. Each panel connects to the next, secured with a cap and supported in place with anchors or tiebacks. This creates a stable, watertight barrier between the water and your property. You can put up a seawall by hand with the right tools and some patience. Hiring a contractor isn’t always needed if you’re comfortable with outdoor projects.
Before starting, it’s often smart to check with local authorities about permit requirements. Sometimes a simple application does the trick, but coastal regulations can be strict, so always double-check.
DIY Vinyl Seawall Installation: Step-by-Step
Building a vinyl seawall takes planning, but you can break it down into steps you can easily handle. Getting everything in order from the start helps the rest of the process go much smoother.
- Assess Your Shoreline: Map out the section you want to protect and notice the slope or any obstructions. Measure the total length and pick a height for your wall. Most vinyl panels come in standard lengths, so rounding up a bit is smart.
- Gather Materials and Tools: Usual supplies include vinyl sheet panels, capping materials (like pressure treated lumber), rebar or tie rods, deadmen anchors, gravel, a sledgehammer, posthole digger, shovel, and a saw. Remember gloves and eye protection for safety.
- Prepare the Site: Clear the area of plants and debris. Dig a trench along the line of your seawall, about 18 to 24 inches deep and wide enough for the panels. Try to reach below the frost line if you’re in colder regions so the wall doesn’t rise up during winter.
- Set the First Panel: Start at the corner or one end. Place the first vinyl panel into the trench, making sure it’s level and properly lined up. Use temporary supports if needed.
- Interlock and Install Additional Panels: Slide the next panel into place, pushing its tongue firmly into the groove of the last one. Tap gently with a rubber mallet for a tight seal. Check for level and straightness every few panels; it’s a breeze to adjust at this stage, but tough once the wall is up.
- Backfill and Anchor: As you set panels, backfill behind them with gravel or coarse sand to add stability and drainage. Add tie rods or rebar at regular intervals and connect them to anchors (deadmen) buried further back on the property. Tiebacks help take pressure off the front of the wall, especially during storms or high water.
- Install the Cap: Once all panels are in place and the trench is filled, top the wall off with a sturdy cap. Many folks use pressure treated timbers or composite boards. Screw or bolt the cap directly through the panels, tying it all together for more rigidity.
- Final Cleanup: Rake out loose soil, double-check your tiebacks and anchors, and use a level for a last inspection. Over time, an occasional check is what you’ll need to keep your seawall in good order.
Before You Start: Things to Think About
Just like any outdoor construction project, putting in a seawall comes with a few details you should never overlook. Here’s what I keep in mind:
- Permits and Regulations: Many towns and counties require permits for shoreline changes. Double-check local rules before breaking ground so you don’t run into trouble.
- Water Levels and Weather: Water levels can shift with the seasons. Try to plan your work for a time when the lake or river is at its lowest.
- Neighbors: Work close to property lines might affect your neighbor’s shoreline. Talk with them beforehand to avoid future headaches.
- Long-Term Maintenance: Even the best seawalls need a little care. Check for leaks, cracks, or backfill washout after storms. Quick fixes are a lot easier than major repairs later.
Assessing Site Accessibility
If your property backs up to the road, hauling in materials is a cinch. If you’ve got a long trek to the water, plan ahead for moving supplies. Sometimes renting a utility cart or small ATV saves serious time and effort.
Dealing with Erosion and Soil Types
Soil can make a big difference in how you build your seawall. Sandy types drain well but aren’t as stable as clay or loam, so you may want more tiebacks or wider deadmen with lightweight material. For rocky areas, dig as deeply as possible but adjust your plan to avoid big rocks. If you’re working on an established shoreline that’s fighting erosion, consider adding filter fabric behind the wall to keep sediment in place and let water pass through.
My Tips for a Successful DIY Vinyl Seawall
After plenty of projects, I’ve picked up a few tips that really help when putting vinyl panels along a shoreline:
- Keep your panels in the shade until you install them, especially in summer—direct sun can make them flexible and trickier to handle.
- When interlocking panels, check both ends are seated before hammering down the next section. Misaligned grooves can make your finished wall look wavy.
- If your shoreline is uneven, mark out the top line with stakes and string ahead of time. This helps keep the top of your wall smooth even if the ground is sloped or bumpy.
- Always use tough anchors that match your soil type. Sometimes, heavy trucks or a small backhoe are needed when digging anchor pits.
- It might be tempting to rush, but spending extra time checking alignment and level will save you a ton of time later.
Common Questions About Vinyl Seawall Installation
People usually have a handful of questions before starting a project like this. Here are some of the most common ones I get, with my answers:
Question: How long will a vinyl seawall hold up?
Answer: With solid installation and some basic care, vinyl seawalls can last 30-50 years. They’re tough in both freshwater and saltwater and stand strong against sun damage.
Question: Can I install a vinyl seawall myself, or do I need a professional?
Answer: If you’ve got a little construction experience, doing it yourself is totally doable. Bring in some friends or family for help—big projects move a lot faster that way. For more complicated jobs or tough sites, calling a pro might be best. But many straightforward lake or canal sites can be finished in a weekend.
Question: What’s the hardest part of the installation?
Answer: Digging the trench and setting anchor points can be the most labor-intensive parts. Rocky or root-filled ground makes it more challenging, but slow and steady gets it done.
Question: Do vinyl seawalls work for every shoreline?
Answer: Vinyl seawalls are a nice choice for most residential lakes and canals. Fast rivers, big waves, or steep banks might need more heavy-duty material or extra engineering. If your site seems tricky, it’s smart to get an expert’s advice.
Choosing the Right Materials for the Job
Using good materials helps your DIY seawall last. I look for panels that are UV-protected and rated for the local weather—these are easy to find at big building stores or marine specialty suppliers. Here’s a quick list of the key supplies:
- Vinyl Sheet Pilings: The main part of the wall—order extra to cover mistakes or future repairs.
- Tiebacks/Anchors: Galvanized steel or composite works well to fight off rust.
- Cap Boards: Pressure treated wood or composite, matched to your landscape style.
- Backfill Material: Coarse gravel or sand for drainage.
It pays to check out installation videos or ask around at local suppliers for product reviews. Hardware staff or neighbors who have done recent seawalls can give tips on which brands last and where to find good prices.
Ready to Get Started?
Putting in a DIY vinyl seawall isn’t too complicated if you plan well, get the right materials, and bring some patience. It’s a solid way to protect your shoreline, boost property value, and pick up useful construction skills along the way. With a few quick checkups and quick fixes when things come up, your new seawall will serve you and your view really well for a long time.
If you’re itching to jump in, start measuring and sketching your property line. Cruise by local hardware stores or marine supply shops to price materials and talk with others who’ve tackled this project—it’s a good way to grab tips and get inspired before you start shoveling.