Steel sheet pile seawalls give you reliable shoreline protection and a long service life when put in the right way. Whether you’re looking to safeguard your waterfront property from erosion or make more usable space along a riverbank, this type of seawall delivers strength and solid durability. After spending years in marine construction, I know firsthand how solid prep, good technique, and smart planning give you results that last. Here’s my personal guide to steel sheet pile seawall installation, built from hands-on knowhow and real-world research.
Understanding What Makes Steel Sheet Pile Seawalls a Popular Choice
Steel sheet pile seawalls are vertical barriers made from interlocking steel panels, driven into the ground alongside shorelines, harbor edges, or riverbanks. The biggest reasons people go for steel are its high strength, long lifespan, and ability to adapt to all sorts of soil and site situations.
Used around the world since the 1800s, these seawalls serve both public and private projects—including ports, marinas, and homes. Steel sheet piles stand up to strong waves, shifting water levels, and harsh storms without losing their usefulness. Thanks to ongoing advances in corrosion protection, modern steel sheet piles last way longer and need way less upkeep compared to older setups.
Core Benefits of Steel Sheet Pile Seawalls
After years on job sites, I can say these key features make steel sheet pile seawalls an appealing pick for both builders and property owners:
- Strength and Stability: Steel handles huge loads from waves and dirt, holding firm under pressure without easily shifting.
- Long Lifespan: With a good protective coating plus occasional basic maintenance, these walls can last for decades—making it a sound investment.
- Fast Installation: Prefabricated panels mean quick placement using digger machinery, helping cut down on construction time and mess.
- Minimal Footprint: Steel sheets take up less space along your shoreline than bulky rock or concrete walls—which is critical if you’re in tight quarters.
- Recyclable and Reusable: Steel’s one of the most recycled building materials worldwide, and used sheets can often get pulled out and put to work on another project.
Getting Ready: Site Survey and Preparation
Building a steel sheet pile seawall starts with a super detailed site check. This part is key—soil type, water depth, slope, and hidden utilities or obstacles all change how you need to set up the seawall design and plan the build.
I always say: get a geotechnical survey to figure out what soils you have, how deep the sheets should go, and which installation method works best. Sandy beaches, mineral-rich soils, or high groundwater all call for different plans—so collect the facts early to avoid headaches later. Also, property owners should check in with local zoning offices for permits, as some take weeks or months to get approved.
Checklist for Site Prep
- Ask a licensed geotechnical engineer for a soil report
- Mark utility lines ahead of time to dodge accidental damage
- Gather all necessary permits and have them handy onsite
- Check site access for moving in big equipment
Key Steps for Installing Steel Sheet Pile Seawalls
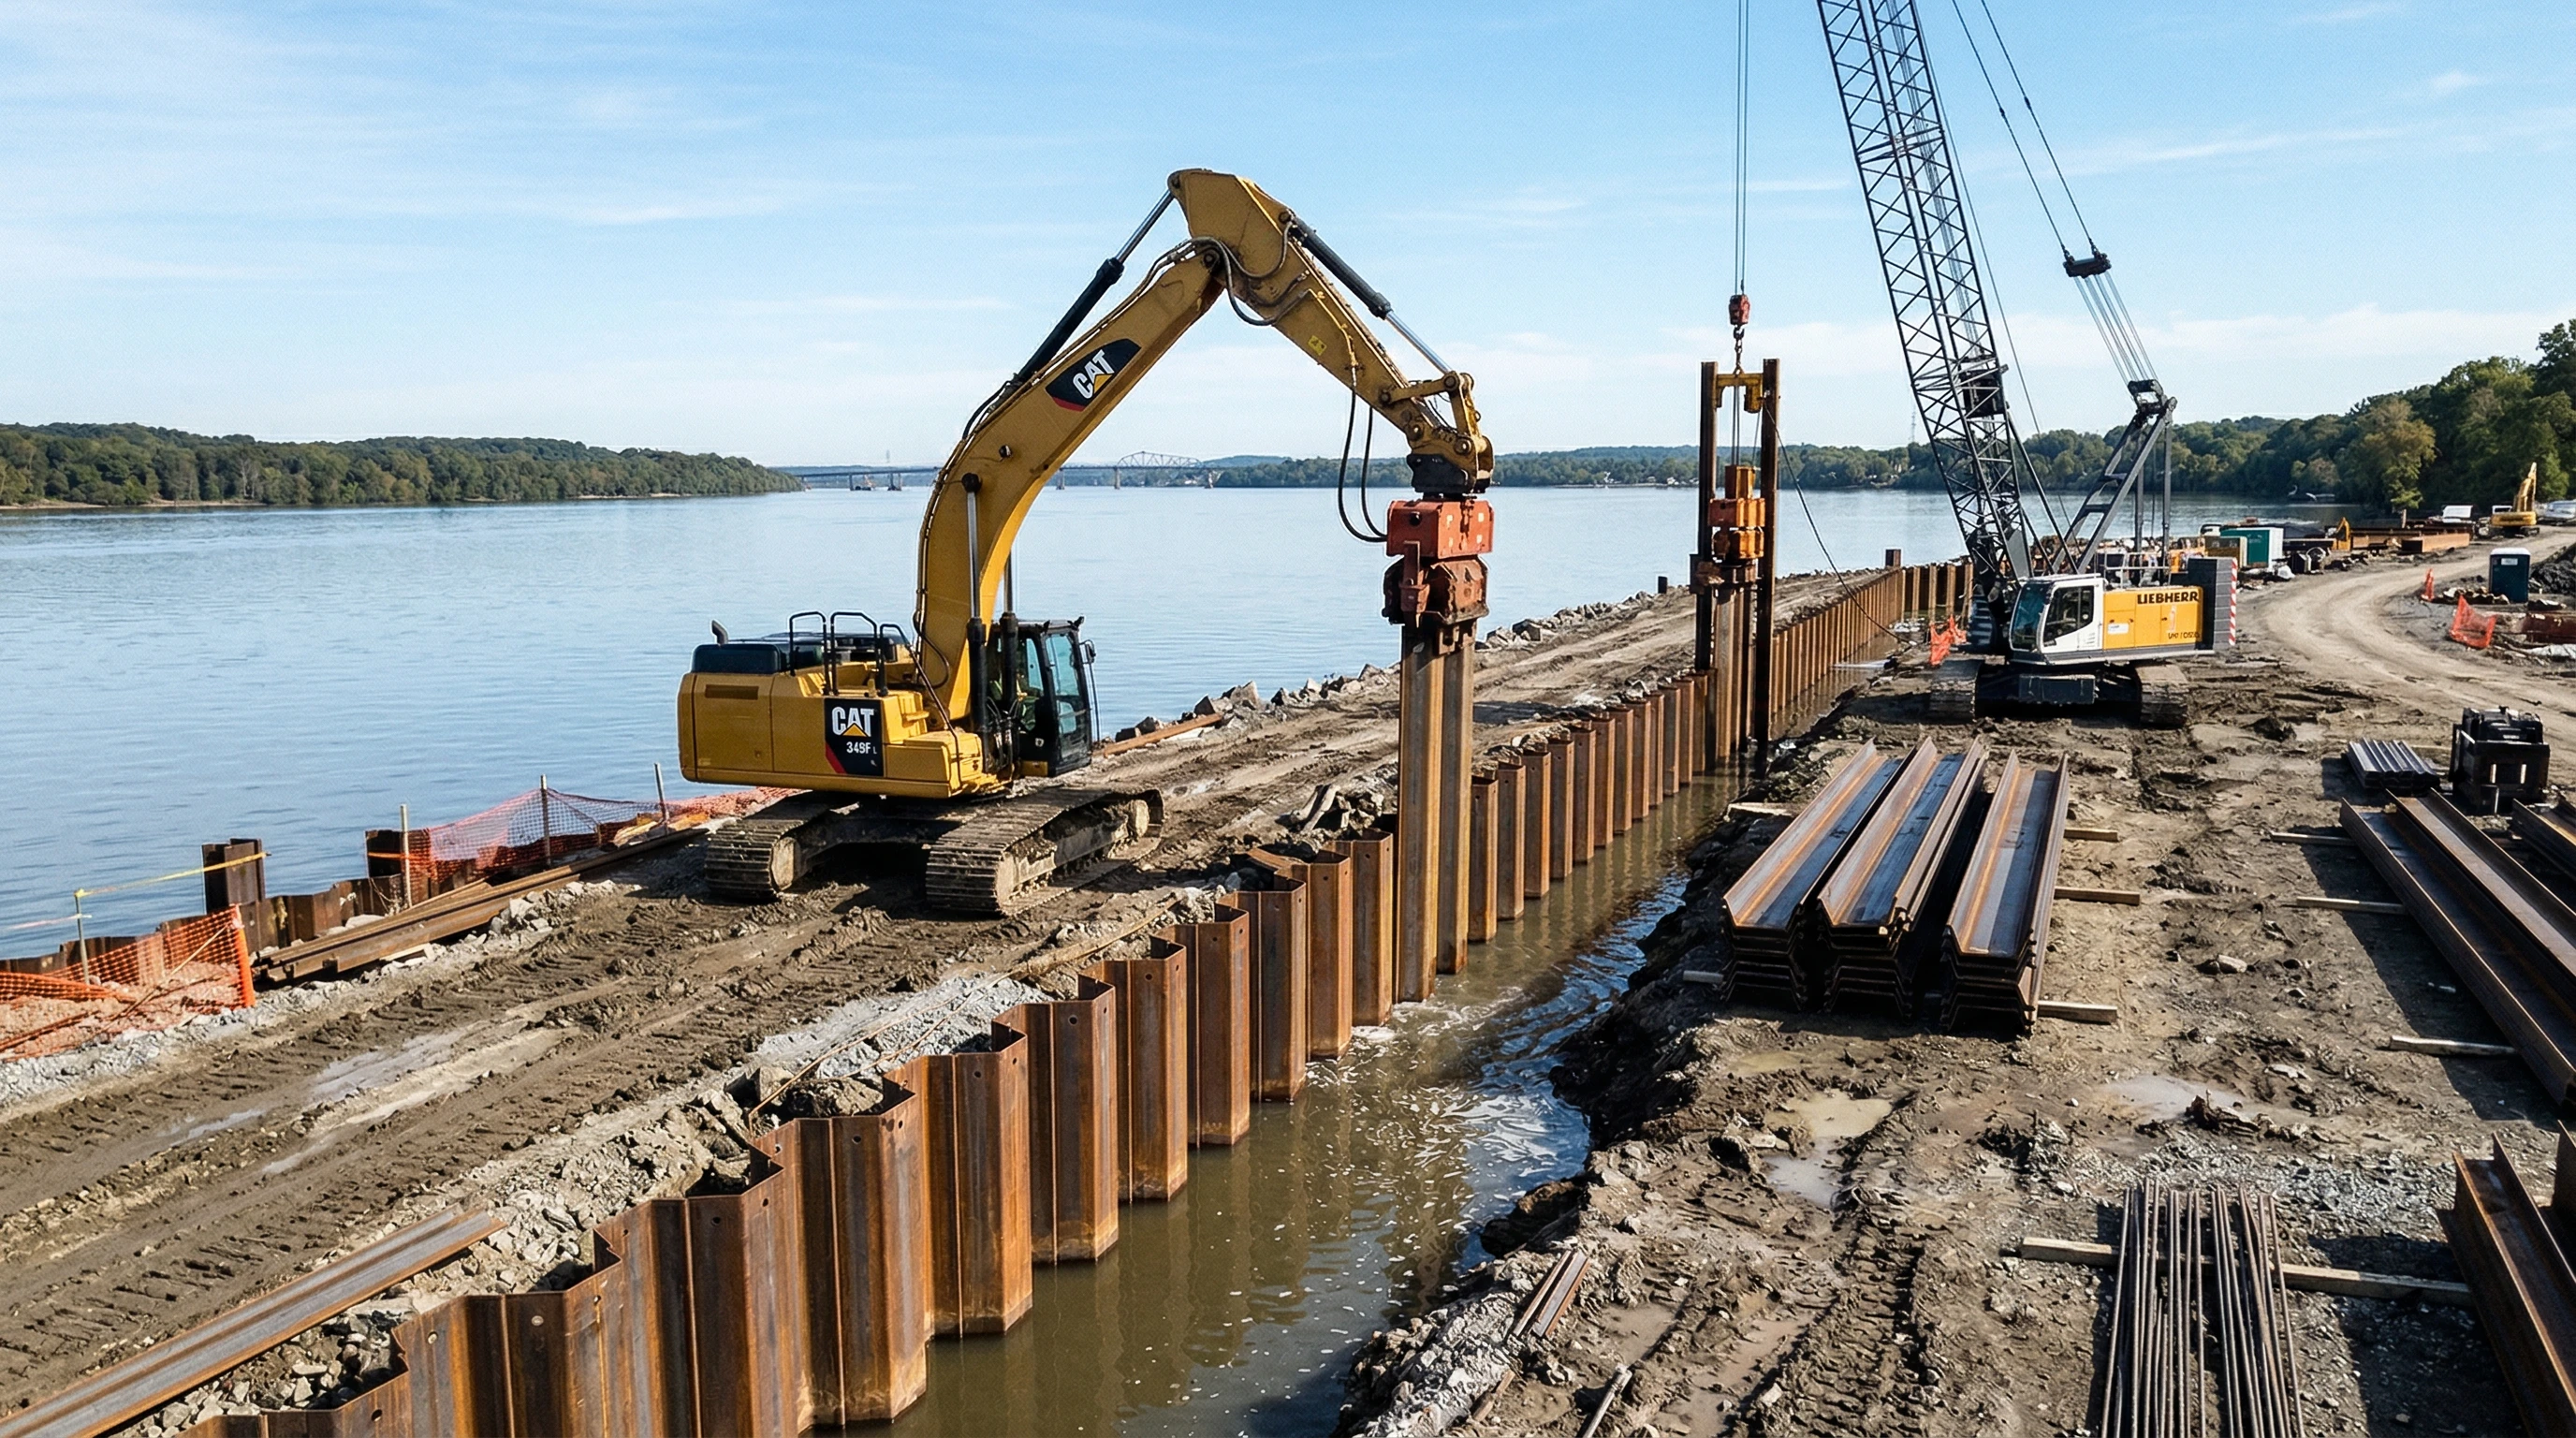
When I start planning a seawall project, sticking to a clear process always leads to the best outcome. Here’s a standard order of operations for steel sheet pile installation:
- Establish a Reference Line: Use survey gear to put down a straight guideline for placing your sheets. Accurate lines help with balanced load and a crisp look along the wall.
- Set Up Equipment: Roll in vibratory hammers, cranes, or excavators fit for your steel sheet length and soil type. Vibratory hammers are typically fast and effective for most soil situations.
- Install Lead Sheet: The first panel goes in with extra care and temporary bracing; this sheet steers the whole alignment. Even small errors here mess up your wall later.
- Drive Remaining Panels: Next, drive each new steel sheet so it locks snugly to the last. Watch for signs of pieces not lining up or stopping short (that might mean you hit old debris or tough ground layers).
- Add Waling and Tiebacks: Once the steel sheets are standing, attach strong wale beams to reinforce the wall and spread out the pressure. Tiebacks get anchored on the land side for added support—especially for tall walls.
- Finish the Wall: Cap the top with steel or concrete, and backfill behind the wall using good granular material that lets water drain easily.
Things to Watch Out for During Installation
Even with top-notch design, things can go sideways fast if details get missed. These are the main challenges I’ve run into—and my ways to keep them in check:
- Obstructions: Hidden rocks, logs, or old debris block driving the piles. Use ground-penetrating radar or test piles to spot problems before you hit them for real.
- Noise and Vibration: Vibratory hammers make a racket and set off ground movement; this might tick off your neighbors or risk close-by buildings. Let residents know ahead of time and monitor vibration to keep everyone happy.
- Corrosion: Saltwater eats steel over time, so go with corrosion-resistant coatings and be sure your steel selection fits the job’s needs to boost wall life.
- Settlement: Bad backfill or packing soil too quickly causes the ground behind your wall to settle down more than planned. Use clean, well-drained dirt, and compact it in thin layers as you go.
Common Installation Questions
- How deep should I drive the piles? Most jobs require driving piles at least a third of their exposed height underneath the shoreline, but go deeper for soft soils or super tall walls.
- Do I need tiebacks for every wall? Not every time, but they’re a smart bet for most walls taller than 5–6 feet or sites with weaker soils. An engineer can recommend what’s safest for your spot.
What Happens After Installation?
When the build is finished, a few follow-ups help your seawall keep working for the long haul. I generally encourage checking for rust, loose caps, or soil washing out along the shore every now and then. Every so often, a cleaning or simple repair (tightening a bolt or brushing on some fresh coating) takes care of small problems before they get out of control.
On busy marinas or waterfronts, boats and debris might bang into steel panels, causing dents or scrapes with time. If you catch these early and patch them up, you’ll prevent minor fixes from turning into big, expensive repairs. After big storms, regular on-site inspections do a world of good, since shifting water can move soil or push hard against the seawall in ways you might not expect.
Advanced Tips for a Successful Steel Sheet Pile Seawall Project
After handling a variety of shoreline jobs, here are extra tricks that improve both results and longevity:
- Pick the Right Sheet Profile: Different makers offer steel pile shapes and thicknesses—aim to match the choice to your soil, exposure, and durability needs.
- Add Cathodic Protection: Installing sacrificial anodes or tying into a current system can really slow down steel corrosion, especially in tough saltwater locations.
- Go With Prefabricated Caps: Factory-made top caps save finish time and create a consistent look atop your wall.
- Space Out Expansion Joints: Steel expands and shrinks as the temperature jumps around, so expansion joints spaced at regular points help keep wall panels from buckling or cracking later on.
Steel Sheet Pile Seawalls in Real-World Applications
Across the globe, waterfront developments, commercial docks, and public parks rely on steel sheet pile seawalls for protection and more usable shoreline. City harbors use them for supporting docks and walkways; at homes, they help stop erosion and keep the water’s edge safer and more accessible for fun over the years.
- Harbors and Ports: Give ships tough, straight sides for docking.
- Residential Properties: Defend land from washing away, big storms, or ice smashing into the edge.
- Environmental Restoration: Change the shape of land for new wetlands or strong riverbanks, while keeping nearby buildings safe from water damage.
Frequently Asked Questions About Steel Sheet Pile Seawall Installation
Question: Can I install a steel sheet pile seawall by myself, or should I hire a contractor?
Answer: Smaller projects might work for a handy DIYer, but most steel seawall jobs need heavy machines, accurate alignment, and careful planning. If it’s more than a basic install, hiring a professional marine contractor makes things far safer and smoother.
Question: How much does a steel sheet pile seawall usually cost?
Answer: Prices depend on wall height, how deep the piles need to go, local site conditions, and labor costs. You’ll generally see a broad range—from $500 up to $2,200 per foot. Ask for quotes from multiple builders and request a clear cost breakdown.
Question: How do I choose between steel, wood, or vinyl sheet piles?
Answer: Steel is the toughest and lasts longest, especially in tough conditions. Wood is cheaper up front but doesn’t last as long and needs way more fixing. Vinyl resists rust and is lighter to install, but it can’t take the same hit from waves like steel can.
Putting in a steel sheet pile seawall costs some serious cash, but with solid planning, expert installation, and a few simple habits for maintenance, you end up with shoreline protection that holds up for many years. The smartest investment is choosing the right materials and pro installation—it gives you peace of mind and extends your shoreline’s life, no matter how water levels and weather trends mix it up in the future.